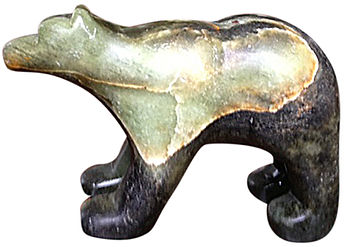
Carving a Bear

3
Medium & Large : Carving a Bear

Click here to download the printable PDF
Introduction
Congratulations! You have an opportunity to produce your own work of art.
As you carve your personal soapstone animal, you must remember
to have fun.
Tools
Rasp
220 grit wet/dry sandpaper
320 grit wet/dry sandpaper
600 grit wet/dry sandpaper
Tung oil (food grade)
Prep
Think of what kind of carving you would like to do. There are many different ways to carve the same animal. Look at pictures in books or on the internet. Looking at a toy model of the same animal can also be helpful. It is good to find pictures of multiple angles.
Keep in mind that soapstone is a soft mineral, so detailed work is very limited. As with all minerals, you will get varying hardnesses between soapstone pieces; however they are all fairly soft.


Set up a bucket of water to carve/sand in,
or dip the carving in as you go.
Water keeps the dust down, making clean up much easier.
Shaping
Look at your soapstone animal and decide which large areas need to be removed. Using a rasp, begin to file these areas away. Start with the areas that require the most material to be removed.
If a textured finish is preferred, I start using my rasp in a controlled direction from bottom to the top.


Feet: Look at the feet of the animal; begin to file in between the legs to make them less blocky. For feet details I use the pointiest rasp i have and “draw” in the individual toes and claws. Remember not to make them too thin in detailing or they will be prone to chipping. Rounding out the belly between the front and hind legs will help give the bear more definition and also get rid of the “blocky” appearance it has to start.
Head: Look at the head; usually animal bodies are larger than the head so file the head down to be more to scale with the body.
Ears: Ears are usually small and tapered. Do these parts at the end as they are easy to snap/file off if they get too thin.
Nose and Eyes: For the scale of the nose, I usually use the width of my rasp on either side of the snout and carve material away flush with the “brow” ridge. I then round it slightly and add some definition to the eyes and ears.

Work your way back and forth around the animal, not doing too much in one section at a time. Keep looking at all angles as you carve. It is easy to get carried away on one section and remove too much material. If this happens, you will just make the whole sculpture smaller.
There are natural
fractures in stone and
it can be easy to drop your
piece while carving.
If a breakage occurs, don't panic!
Let your piece to dry, then use
superglue to repair the break.
Allow time for the glue to
cure, and continue
carving.

Sanding
Once satisfied with your animal's shape, it is time to begin sanding. Starting with the coarsest mesh of sandpaper, sand away all the unwanted tool marks. Follow with the next coarsest, and then the finest. Continue until the sculpture is nice and smooth. This is an important step! The better your sanding, the better the sculpture will look when oiled.
Sanding in water is a must, because frequently dipping it will show you where more sanding is needed.
Leave your sculpture to dry, or warm it on the stovetop on low until the stone is completely dry.
Oiling
Included in the kit is a food grade tung oil. Apply the oil with a thin rag. Allow 24 hours before applying a second coat. Tung oil leaves a more matte finish. If you want your carving to be super shiny, spray with an aerosol water-based wood varnish available from most local hardware stores. Traditionally, carvings are heated up and beeswax is applied to the surface.


Breakage
Sometimes stones get dropped or seams in the stone let go and break while carving. When this happens, the first thing to do is stop carving.
Rinse off any dust on the carving and let dry. Do not rub the pieces together, as this may alter your contact points making the breakage point more noticeable. Once dry, apply a medium viscosity superglue on one of your contact points. Place the two pieces together, squeezing them together until excess glue weeps out the sides. Place your carving it in a spot where it will sit undisturbed until the glue sets, usually about 15-30 minutes. Once cured, use a rasp to remove excess glue, and continue carving. If there is a big gap missing, you can make a filler by mixing with extra dust with an epoxy glue.


